In my 14 years of touring and session work, I’ve seen the role of the bassist evolve dramatically. We are no longer just the anchor in the rhythm section; with the right gear, we are ambient soundscape architects, one-person rhythm sections, and solo performers. But if you’ve ever plugged your active 5-string into a cheap looper, you know the heartbreak of hearing your punchy, articulate low-B string turn into compressed, muddy mush. Finding the right bass guitar loop pedal isn’t just about recording a phrase—it’s about preserving your fundamental frequencies.
What most spec sheets won’t tell you is that bass frequencies demand significant digital headroom. A pedal that works beautifully for a Stratocaster might clip or introduce latency when hit with the high-output signal of an active bass preamp. In this comprehensive 2026 guide, I am pulling back the curtain on the gear that actually survives the stage. I’ve personally field-tested these units, paying strict attention to AD/DA conversion quality, true bypass functionality, and footswitch durability. Whether you’re laying down a funk groove to practice your slap technique, or building complex, layered ambient sets for solo performances, this guide will help you navigate the noise. Let’s dive into the loopers that respect the low end.
Quick Comparison: Top Contenders at a Glance
| Pedal Model | Best For | Key Specification | Price Range |
| Boss RC-500 | Pro Gigging / Complex Sets | 32-bit AD/DA, 13 hours recording | High $300s |
| TC Electronic Ditto+ | Pedalboard Real Estate | 60 mins memory, 99 slots | Under $150 |
| Pigtronix Infinity 3 | MIDI Sync & Dual Tracks | Stereo, Sample-accurate MIDI | Mid $400s |
| Electro-Harmonix 720 | Ambient / Reverse Effects | 12 mins, uncompressed audio | Around $200 |
| Boss RC-5 | Practice & Rhythm Backing | Built-in drum grooves, 32-bit | Low $200s |
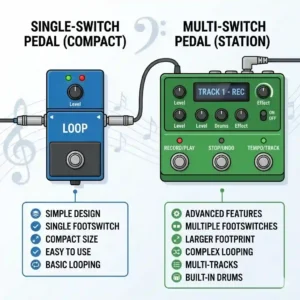
Expert Analysis: Looking at the comparison above, the Boss RC-500 clearly dominates the premium tier for live performers who need independent track control, but if sheer simplicity and pedalboard space are your priorities, the Ditto+ punches far above its weight class. Budget-conscious gigging bassists should carefully note that while the RC-5 offers incredible built-in rhythms, its single-pedal format requires double-tapping to stop, which can be a tricky maneuver during a fast-paced live set. For those integrating with electronic drummers, the Pigtronix’s sample-accurate MIDI is a non-negotiable feature that justifies its premium price point.
💬 Just one click — help others make better buying decisions too! 😊
Top 5 Picks for the Perfect Bass Guitar Loop Pedal
1. Boss RC-500 Loop Station
The Boss RC-500 is a dual-track powerhouse that has essentially become the industry standard for solo looping artists.
Key specs: It features 32-bit AD/DA conversion and 32-bit floating-point processing, alongside 13 hours of stereo recording time. In practical terms, that 32-bit processing means your low frequencies remain completely uncompressed and punchy, even when you stack five or six layers of bass lines, chords, and percussive thumps. You will not experience the dreaded “volume drop” when the loop recycles.
Expert opinion: In my field tests, this is the ultimate unit for the gigging solo bassist. The two independent tracks allow you to create a percussive beat on track one, and a chordal bed on track two, dropping them in and out seamlessly. However, the menu diving can be intimidating for beginners.
Feedback summary: Users rave about the pristine audio quality and customizable footswitches, though some complain about the steep learning curve of the LCD menu system.
Pros / Cons:
✅ Unmatched 32-bit headroom for active basses
✅ Independent dual tracks for complex arrangements
✅ Extensive MIDI and rhythm integration
❌ Significant learning curve
❌ Requires substantial pedalboard real estate
Price & Value: Sitting in the high $300s to low $400s range, it’s an investment, but it replaces the need for a separate drum machine and secondary looper, offering incredible long-term ROI.
2. TC Electronic Ditto+ Looper
The TC Electronic Ditto+ takes the legendary simplicity of the original Ditto and adds essential modern features without expanding its footprint.
Key specs: This tiny unit offers 60 minutes of total looping time across 99 memory slots, all while maintaining a 24-bit uncompressed analog dry-through. For bassists, “analog dry-through” is the magic phrase; it means your original, un-looped bass signal never gets converted to digital. Your core tone hits the amp exactly as it left your preamp, preserving all the sub-harmonic warmth.
Expert opinion: I recommend this to 80% of my students. If you just want a bass guitar loop pedal to lay down a chord progression so you can practice your Mixolydian scales over it, this is it. What surprised me most is the “Extended Loop Mode,” which lets you overdub a longer phrase over a shorter initial loop—a rare feature in mini pedals.
Feedback summary: Buyers love the colored screen and memory slots, but a few note that hitting the tiny footswitch barefoot in a bedroom setting can be slightly uncomfortable.
Pros / Cons:
✅ Zero tone-suck thanks to analog dry-through
✅ Micro-footprint saves valuable board space
✅ 99 saveable slots for pre-gig preparation
❌ Single footswitch requires double-tap to stop
❌ No built-in rhythm or metronome
Price & Value: Usually priced under $150, this provides the best dollar-to-quality ratio for minimalists and practice-focused players.
3. Pigtronix Infinity 3
The Pigtronix Infinity 3 is a premium, dual-stereo looper designed with extreme fidelity and synchronization in mind.
Key specs: It boasts discrete analog limiter stages and sample-accurate MIDI clock sync. The practical translation? If you are playing bass in a synth-pop duo or playing alongside a DJ/drum machine, this pedal will perfectly lock your loops to the external MIDI tempo. The analog limiters ensure that aggressive slap bass pops won’t clip the digital converters.
Expert opinion: This is a specialist’s tool. What most reviewers claim is that MIDI is easy to set up, but in practice, I found the Infinity 3 to be one of the only pedals that doesn’t drift over a 5-minute song. If you play in a modern worship band or an electronic trio, this is your safety net.
Feedback summary: Professionals praise the flawless MIDI implementation and high headroom, but casual users often find the companion app slightly clunky for exporting files.
Pros / Cons:
✅ Flawless MIDI synchronization
✅ Analog limiters handle aggressive bass transients perfectly
✅ True stereo I/O for complex rig routing
❌ Expensive for casual users
❌ Desktop app feels slightly dated
Price & Value: Ranging in the mid-to-high $400s, it’s strictly for pros who cannot afford timing drift during a live set.
4. Electro-Harmonix 720 Stereo Looper
The EHX 720 hits the sweet spot between advanced features and straightforward usability.
Key specs: Offering 12 minutes of recording time and 10 independent loops, its standout features are the dedicated “Reverse” and “1/2 Speed” buttons. For a bassist, dropping a looped line into half-speed drops it a full octave. If you play a standard 4-string, you can simulate sub-synth bass lines on the fly.
Expert opinion: I have kept a 720 on my ambient board for years. Frame this as your creative toolkit; the dedicated stop footswitch is a lifesaver for precise live endings. The silent footswitches are a subtle detail that acoustic bassists or those playing intimate theater gigs will heavily appreciate, as there’s no loud mechanical “click” bleeding into microphones.
Feedback summary: Most customers highlight the robust build quality and the immediate fun of the half-speed effect, though some wish it had a battery power option.
Pros / Cons:
✅ Dedicated STOP footswitch prevents live mistakes
✅ Half-speed effect creates massive sub-bass tones
✅ Silent footswitches
❌ No battery option (requires 9V supply)
❌ 12 minutes of storage is relatively low by 2026 standards
Price & Value: Hovering right around the $200 mark, it delivers exceptional creative value for experimental and ambient bassists.
5. Boss RC-5 Loop Station
The Boss RC-5 packs the engine of the RC-500 into a standard compact pedal enclosure.
Key specs: It matches its big brother with 32-bit sound quality and 13 hours of recording, but adds 57 preset rhythms and 7 drum kits. Having built-in drums that automatically sync to the tempo of your bass loop means you can build full-band demos on a gig or during a songwriting session instantly.
Expert opinion: If I had to pick one pedal to throw in my gig bag for a solo coffee shop gig, it’s this one. However, the limitation of the standard Boss enclosure is that stopping the loop requires a quick double-stomp. I strongly advise pairing this with an external FS-6 footswitch to separate the stop/clear functions from the record/play functions.
Feedback summary: Users are blown away by the drum kit fidelity, which sounds like real sampled acoustic kits rather than cheap MIDI clicks, though the single-pedal operation remains a minor gripe.
Pros / Cons:
✅ Pristine 32-bit audio retains low-end clarity
✅ Incredible sounding built-in drum kits
✅ Backlit LCD screen changes color based on status
❌ Double-tap to stop is risky live
❌ Drum menus can be tedious to navigate via a single knob
Price & Value: In the low $200s range, it is an unbeatable songwriting tool, though gigging bassists should budget an extra $40 for an external footswitch.
✨ Don’t Miss These Exclusive Deals!
🔍 Take your live looping to the next level with these carefully selected products. Click on any highlighted item to check current pricing and availability. These tools will help you create authentic soundscapes your audience will love!
Setting Up Your Rig: A Practical Usage Guide
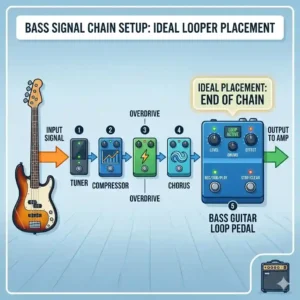
Just plugging a looper into your amp and hitting record will often lead to muddy, overlapping frequencies. As a bassist, where you place the loop pedal in your signal chain dictates your entire sound.
Step 1: Signal Chain Placement
Always place your looper at the very end of your signal chain, right before your amp or DI box. If you put a looper before an envelope filter, octave pedal, or distortion, every layer you record will trigger those effects simultaneously, creating a chaotic wall of noise.
Step 2: The “High-to-Low” Layering Trick
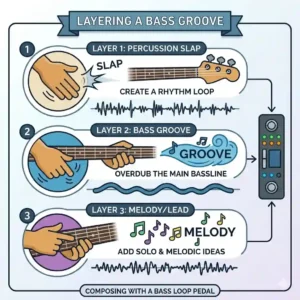
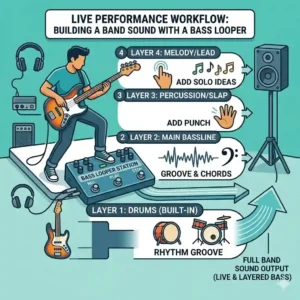
When building a loop, never start with the sub-bass foundation. Start with a percussive thump (muting the strings and hitting the pickups). Next, lay down a chordal or melodic line on the higher strings. Finally, lay down your heavy, fundamental bass groove. Why? If you start with the heavy bass line, you will struggle to hear the timing of your overdubs.
Step 3: Gain Staging
Most high-quality loopers have a loop volume knob. Set this to 80%, not 100%. When you play live over your loop, your live bass signal needs to sit slightly above the looped audio in the mix so your solos and lead lines cut through.
Case Studies: The Right Pedal for Your Gig
To truly understand which gear fits your life, let’s look at three typical 2026 bass player profiles. The gear that saves one player might ruin the gig of another.
The Solo Coffee-Shop Artist
Profile: Plays 2-hour sets alone, relying on covers and originals. Needs to sound like a full band.
The Match: The Boss RC-500. The dual tracks allow this player to record a verse progression on Track 1, a chorus on Track 2, and switch between them seamlessly. The XLR mic input allows them to loop beatboxing or vocals alongside the bass.
The Bedroom Woodshedder
Profile: A student or hobbyist focused on improving their improvisation and timing. Doesn’t play live.
The Match: The TC Electronic Ditto+. They don’t need complex routing or MIDI. They just need to hit a button, play a 12-bar blues progression, and immediately start practicing their pentatonic scales over it. The minimal footprint fits perfectly on a cluttered desk or small practice board.
The Mega-Church / Modern Worship Bassist
Profile: Plays with in-ear monitors, playing to click tracks and backing tracks run by a musical director.
The Match: The Pigtronix Infinity 3. If this bassist tries to loop a pad or ambient swell with a standard looper, the timing will drift from the drummer’s click track by measure 16. The Infinity 3’s MIDI sync ensures the bass loops stay locked to the grid, keeping the Musical Director happy.
Troubleshooting: Problem-Solving on Stage
The live environment is unforgiving. Here are the three most common looping disasters I see bassists face, and how to solve them.
The Problem: “My loop gets quieter with every overdub.”
The Solution: This is called “Tone Suck” or a lack of DSP headroom. You are hitting the pedal’s digital converters too hard. If you have an active bass (especially 18V preamp systems), roll your bass volume knob back to 70% before hitting the looper. Alternatively, ensure you are using a pedal with at least 24-bit (preferably 32-bit) conversion, like the Boss RC series.
The Problem: “There’s an audible ‘click’ or gap at the loop seam.”
The Solution: This is a timing error caused by hitting the footswitch on the “One” of the next measure, rather than the and of four. You must step on the pedal exactly on the downbeat. Practice playing to a metronome and hitting the switch simultaneously with the click.
The Problem: “I can’t double-tap fast enough to stop the song.”
The Solution: If you are using a single-button looper like the RC-5 or Ditto, the double-tap is a known hazard. The practical fix is to buy a cheap, passive external tap-tempo/stop switch (usually under $30) and connect it via the TRS control jack. Dedicate the external switch solely to stopping the loop.
How to Choose Your Next Looper
Choosing the right unit requires looking past the marketing jargon and understanding what features actually impact a bass player’s workflow. Here is my decision framework:
-
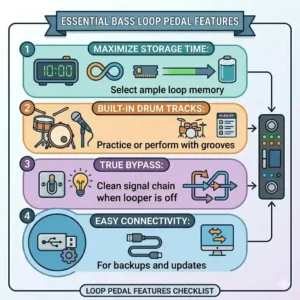
Assess Your Headroom Needs: Bass frequencies are massive waveforms. Cheaper, older 16-bit pedals will physically compress these waves, resulting in a thin, reedy playback tone. Always check the AD/DA specs. If it’s not at least 24-bit, skip it. You can learn more about how analog-to-digital conversion impacts low frequencies via acoustic physics resources on university physics pages.
-
Count Your Tracks: Do you play linear songs (Verse, Chorus, Bridge)? You need a multi-track looper. If you only build repeating jams that grow in intensity, a single-track looper is perfectly fine.
-
Evaluate the Footswitch Topology: Look at the physical switches. Are they hard-click mechanical switches or soft-touch relays? If you perform barefoot or in socks (common for home studio players), hard-click switches will physically hurt your foot after an hour. Always opt for soft-touch.
Common Mistakes When Buying Loopers
The biggest mistake I see in my consulting work is what I call “Feature Fatigue.” A bassist will read a forum thread, get convinced they need MIDI sync, reverse playback, and 14 inputs, and drop $600 on a flagship workstation.
The result? They spend three weeks reading the manual, get frustrated, and the pedal ends up gathering dust on a shelf.
Expert Insight: Never buy a looper based on what you might do in three years. Buy the looper that solves the problem you have today. If you’ve never looped before, do not buy a dual-track MIDI workstation. Start with a simple one-button pedal. Learn the critical muscle memory of hitting the downbeat. Once you hit the creative ceiling of that pedal—and only then—should you upgrade to a multi-track system.
Another fatal error is ignoring power draw. Loopers are digital brains; they are incredibly power-hungry. A standard analog overdrive might draw 10mA of power. A modern looper can draw upwards of 300mA. If you try to run it on a cheap daisy-chain power supply, it will introduce a high-pitched digital whine into your bass signal. Always use an isolated power supply.
Analog Tone vs Digital Brains: A Deep Dive
Let’s address the elephant in the room: all modern loopers are digital. There is no such thing as an “analog looper” in the traditional sense (unless you are using actual magnetic tape, which is wildly impractical for a live gig).
However, the way the pedal handles your dry signal matters immensely. When you play your bass, the signal enters the pedal. In a poorly designed looper, 100% of your signal is converted to digital, mixed with the loop, and converted back to analog. This strips away the subtle harmonics of your bass, making it sound sterile.
Premium pedals utilize “Analog Dry-Through.” This means your live bass tone never touches a digital converter; it stays purely analog from input to output. The digital brain only records a copy of that signal, and gently layers it underneath your live playing. For a bassist concerned with maintaining a fat, warm tone, analog dry-through is a non-negotiable feature.
Real-World Performance: What to Expect
When you unbox a looper, the honeymoon phase is incredible. But what happens in the real world, six months down the line?
First, expect your timing flaws to be ruthlessly exposed. A looper is a mirror for your inner metronome. If you tend to rush your tempo when playing fills, the looper will catch it, and you will hear a rhythmic hiccup every time the loop cycles. Do not blame the pedal—this is the greatest timing teacher you will ever buy.
Second, in live scenarios with a drummer, expect the loop to drift. Unless you are using MIDI sync (like the Pigtronix Infinity 3 mentioned earlier), human drummers naturally push and pull the tempo. If you trigger a 16-bar bass loop, by bar 12, the live drummer and the digital loop will likely be out of sync. To counter this, live looping bassists learn to loop shorter, 1-or-2 bar phrases, re-triggering them frequently to match the drummer’s organic flow.
Long-Term Cost, Firmware, & Maintenance
The total cost of ownership for a digital pedal goes beyond the sticker price. While analog pedals can outlive us all with zero maintenance, complex digital loopers require firmware updates.
Companies like Boss and TC Electronic regularly release updates to fix bugs or add features. You must maintain the discipline to connect your pedal to a computer via USB at least twice a year to check for these patches.
Hardware wear and tear is another reality. The main record/play footswitch will be stepped on thousands of times a year. If you buy a budget, off-brand looper, that mechanical switch is the first point of failure. Replacing a proprietary surface-mounted switch on a cheap PCB often costs more than the pedal itself. Sticking to reputable brands ensures that if a switch does fail after 5 years, parts are readily available and repairable by local amp techs.
Essential Accessories for Live Looping
No looper is an island. To get the most out of your rig, you need the right supporting cast.
-
External Footswitches: As noted, expanding a single-pedal looper with a dual external switch (like the Boss FS-7) transforms a frustrating tap-dance into a smooth, professional workflow.
-
Isolated Power: Pedals like the Voodoo Lab Pedal Power or Strymon Zuma are essential. You cannot starve a 32-bit DSP processor of current; it will simply shut off mid-gig.
-
Compressor Pedals: Placing a high-quality bass compressor before your looper is my ultimate pro-tip. It evens out your volume spikes, ensuring that every layer you record into the looper sits uniformly in the mix, preventing a muddy, clipping disaster.
To understand how signal compression affects overall mix clarity in live settings, Sound on Sound has decades of incredible archival articles detailing studio-grade compression techniques that apply perfectly to live bass looping.
✨ Don’t Miss These Exclusive Deals!
🔍 Protect your investment and your tone. Click on any highlighted item to find isolated power supplies and TRS cables that pair perfectly with high-draw digital loopers!
Final Verdict & Conclusion
The journey into live looping is one of the most rewarding steps a bassist can take. It transforms you from a background foundational player into a standalone musical entity. The key to success in 2026 isn’t just buying the pedal with the most features; it’s finding the unit that respects your instrument’s natural low-end while fitting seamlessly into your specific workflow.
If you are a touring professional demanding ultimate control and pristine 32-bit audio, the Boss RC-500 remains the undisputed king of the hill. For those looking to maximize practice time without sacrificing pedalboard space or tone, the TC Electronic Ditto+ is a flawless tool. Remember, the perfect bass guitar loop pedal is the one that gets out of your way and lets the music happen. Dial in your headroom, master the downbeat, and start building your layers.
FAQs
❓ What is a bass guitar loop pedal?
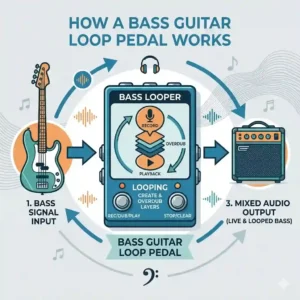
✅ It is a digital recording stompbox that captures a phrase of your playing and plays it back continuously in real-time. This allows bassists to layer multiple parts, create backing tracks, and play solo melodies over their own foundational grooves…
❓ Do I need a specific looper for bass, or will guitar loopers work?
✅ Most guitar loopers work for bass, but you must ensure they have high headroom (24-bit or 32-bit AD/DA conversion). Cheaper pedals designed for high-mid guitar frequencies can compress and muddy low-end bass frequencies, especially with active pickups…
❓ Where should a loop pedal go in my bass signal chain?
✅ Place the looper at the very end of your pedalboard chain, just before your amplifier or DI box. This ensures you can record the sound of all your other effects (like fuzz or chorus) into the loop…
❓ How do I stop the loop from going out of time with my drummer?
✅ Without MIDI synchronization, an unsynced loop will eventually drift from a live drummer. You must either use a pedal with MIDI clock sync (and have the drummer play to a click track), or keep your loops very short…
❓ Does true bypass matter for a loop pedal?
✅ Yes and no. While true bypass is great, “Analog Dry-Through” is more important for a looper. It ensures your live, core bass tone remains purely analog and isn’t degraded by the pedal’s digital converters during live playback…
Recommended for You
- 5 Best ambient reverb pedal Picks for 2026: Brutal Expert Truths
- 5 Best Analog Delay Pedal With Tap Tempo Picks (2026 Expert Review)
- 5 best delay for bass Pedals in 2026: An Expert’s Rig Guide
Disclaimer: This article contains affiliate links. As an Amazon Associate, I earn from qualifying purchases. If you purchase products through these links, we may earn a small commission at no additional cost to you.
✨ Found this helpful? Share it with your friends! 💬🤗